On the header of every reservation and section, you will see the same information as below.
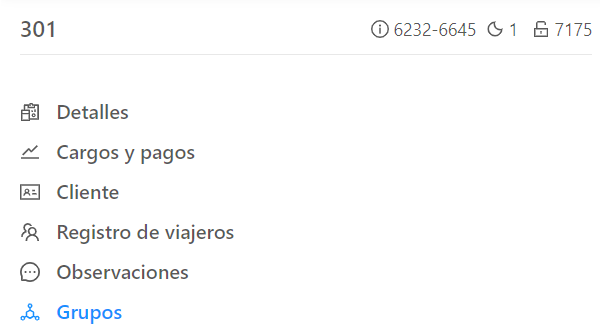
There you have to indicate the room number, the reservation number, the number of nights and the access code for the room if it is needed.
The bottom of this reservation is split into sections.
This section of details or reservation data is the visible one by default.
Here you can change the color of the reservation, the number of guests, the rate, move it from room to room, put the comments, change the status or delete it.
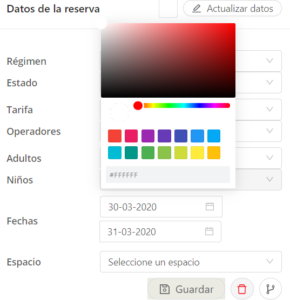
Color of reservation: modify the color by clicking the white box on the left of Update data.
Regime: a drop down menu will display to select the restaurant regime (this has to be configured in advance from the PMS. Further information here.)
Status: choose the status of the reservation from the drop down menu.
Rate: select among the different rates configured previously (further information about the creation of rates from the PMS by clicking here.)
Operator: choose one among the different operators created in advance (further information about the creation of operators from the PMS by clicking here.)
Adults: point out the number of adults who will stay in the room.
Children: point out the number of children who will stay in the room.
Dates: modify arrival and departure date.
Type of room: select which room you want to assign the reservation to.
The three buttons below have different functions.
Save button: it is in grey by default. If any modification is made, the color will change to blue, so that the modified data can be saved.
Delete button: it is represented by the following icon: trash. This allows you to delete the reservation. It demands a confirmation.
Remove button: It is represented by the following icon: share. If the reservation is in a room, this button helps you to remove the room assigned, known as leaving the reservation out of the planning. When this happens, it will automatically place it in an available room, previously confirmed by the user.
Comments of the client: you can write in this blank the comments of the client.
Comments of the reservation: you can write in this blank the comments of the reservation.
This is the second section you will see on the app and the desktop site.
Here you can check, delete or add charges to the room, view its payments and the pending amount.
Therefore, we split it into two sections:
“Charges information”
here you can modify, delete or add discounts to the charges of the room.
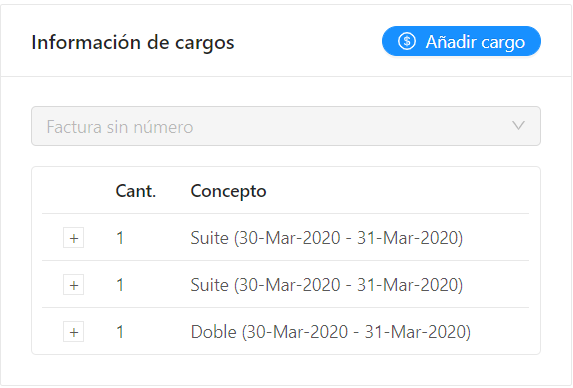
Add charges:
press the add charges button. Then write the charge to add or select one of the predefined ones from the PMS (further information about the predefined charges here).
Delete a charge: press the + button on the left of the charge. Then click on the icon trash. This option demands a confirmation.
Creation of discounts: click on the + button on the left of the charge. Then add the discount on the discount subsection, either an amount in your configured local currency, or as a percentage of the total charge.
Modify price reservation: if you do not want to make discounts, you can modify the final price. Just click on the + button on the left of the charge. Then edit the final price in the total subsection.
“Payment information”
This section is at the bottom. You can check the payments made in the reservation, the pending charges, and add the payment in case of charging the amount of the reservation.
To add a total or partial payment to the reservation, click on the add income button. Then enter the amount, the currency for the charge, the charge method, and the option of adding a description.
This section will allow you to modify or view the data of the holder of the booking, as well as the debit/credit card, if you have this information in the reservation.
This section is split into three subsections:
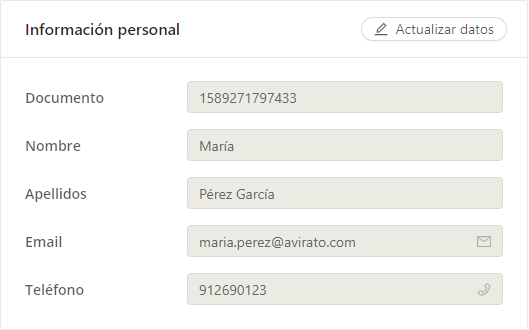
“Personal information”
Here you will find the holder’s contact information.
The fields are locked for safety, so if you want to modify or add a piece of information, click on update data before doing it.
If you click on the envelope icon which is on the email, a window will appear to select one of the templates predefined previously from the PMS (further information here), as well as send a template or open the email to send one email manually.
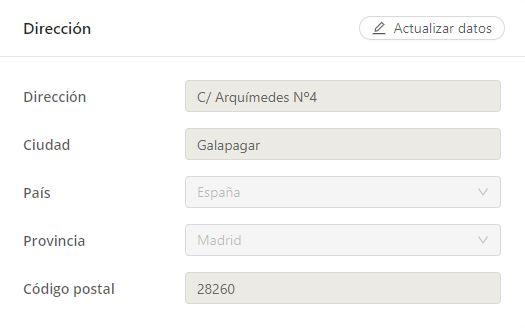
“Address”
Here you will find the holder’s data related to the address, such as nationality, country, etc.
As in the previous subsection, the fields are locked for safety, so you must click on update data to empower them.
“Account data”
In this section, you can only visualize the number card. You cannot add or modify data.
You need to click on the eye icon to see the card data locked by default.
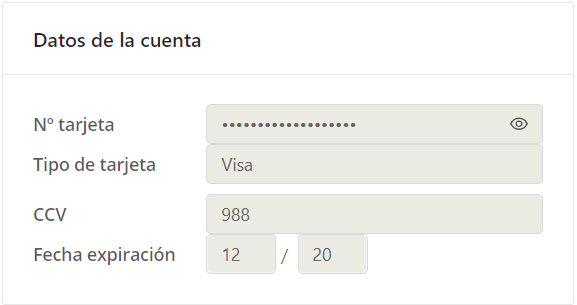
Image with the data codified.
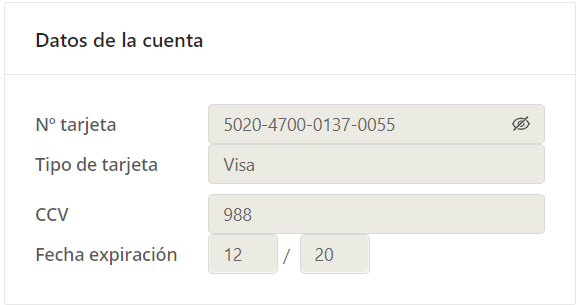
Image with the data visible.
This “Groups” section is only visible if the reservation is made up of a group, if not, this tab will not be visible.
Here you can see the reservation which belongs to the group, the guests, and the unpaid cost of each booking. Also, it is possible to visualize which is the master reservation and which one is being viewed at the moment.
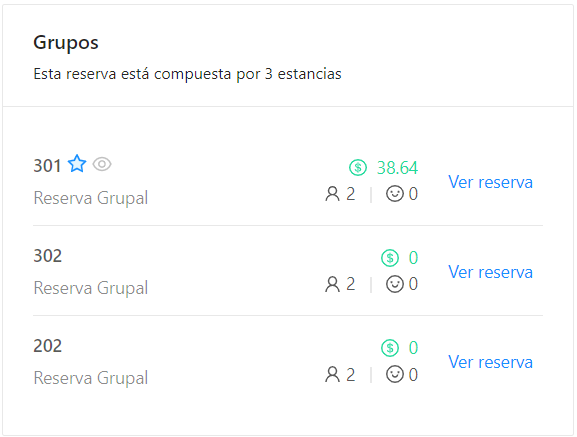
Therefore, on the header you will be told of the amount of stays or reservations which the group reservation is composed of.
The blue star icon in the reservation shows that it is the master one, the eye icon is the reservation being viewed, the dollar symbol is the cost of the room, the icons below the prices indicate the number of adults and children. Finally, the See reservation button allows you to change to another reservation within the group without using the planning.